Assembling Your Trinity Christmas Artificial Christmas Tree: A Step-by-Step Guide
The Christmas season is upon us, and there’s nothing quite like the joy of setting up your Christmas tree to kick off the celebrations. If you’ve chosen a Trinity Christmas Artificial Christmas Tree, you’re in for a treat. These trees are known for their lifelike appearance, easy assembly, and top-notch quality. In this guide, we’ll walk you through the straightforward process of assembling your tree, so you can enjoy a stunning holiday centerpiece in no time.
Step 1: Unbox with Care
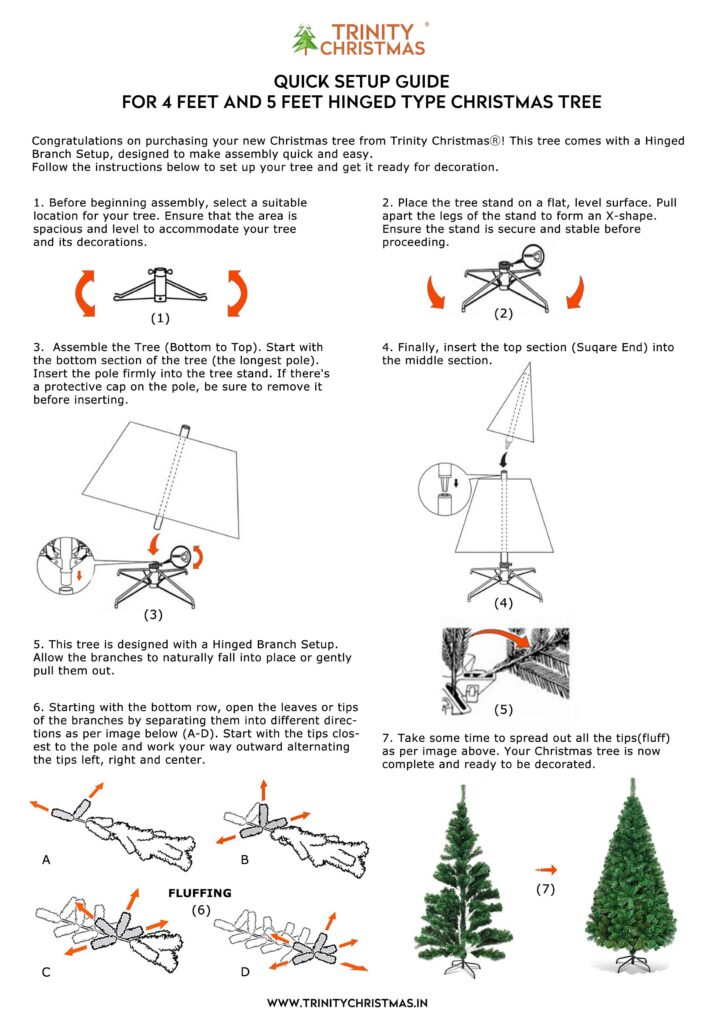
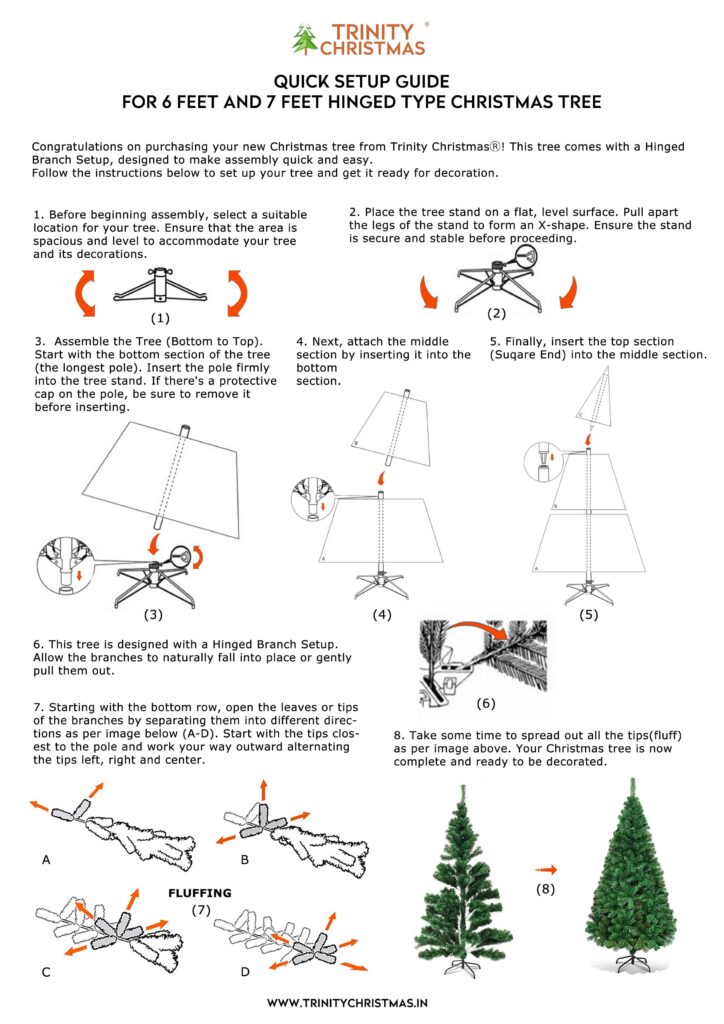
Start by finding a spacious, well-lit area to unbox your Trinity Christmas tree. Carefully remove all the components from the packaging, including the tree sections, metal base, and any additional accessories. Lay everything out neatly, ensuring you have all the parts before beginning the assembly.
Step 2: Prepare the Base
Assemble the metal base by laying it flat on the floor and spreading the legs evenly to ensure stability. Trinity Christmas trees often come with pre-attached brackets or screws to secure the tree to the base. Follow the provided instructions to lock the tree firmly into place.
Step 3: Connect the Tree Sections
Your Trinity Christmas tree is designed for easy assembly, with hinged branches or sections that fit together seamlessly. Begin by connecting the bottom section to the base, then work your way up by aligning and inserting the remaining sections until you reach the top.
Step 4: Fluff and Shape the Branches
Once your tree is assembled, take some time to fluff and shape the branches. This step is crucial for achieving a full, natural look. Start from the innermost branches and work outward, gently spreading each branch to add depth and volume to your tree.
Step 5: Adjust the Height
Many Trinity Christmas trees feature adjustable branches, allowing you to customize the height and overall appearance. Adjust the branches to your desired fullness and shape, ensuring your tree looks just the way you want it.
Step 6: Check the Lights (If Applicable)
If your tree comes pre-lit, plug in the lights and ensure all bulbs are functioning. Take this opportunity to arrange the lights evenly, ensuring balanced illumination throughout the tree.
Step 7: Decorate to Your Heart’s Content
Now comes the fun part—decorating your tree! With its sturdy construction and ample branch spacing, your Trinity Christmas tree is the perfect canvas for your holiday creativity. Add ornaments, garlands, and other festive decorations to bring your vision to life.
Step 8: Step Back and Enjoy
Once you’ve finished decorating, take a step back and admire your handiwork. Your Trinity Christmas Artificial Christmas Tree is now a stunning centerpiece, radiating holiday cheer throughout your home. Share the joy with loved ones and bask in the festive atmosphere you’ve created.
Assembling your Trinity Christmas tree is a hassle-free and enjoyable experience, thanks to its thoughtful design and exceptional quality. With clear Artificial Christmas Tree Assembly Instructions, this tree will not only enhance your Christmas decor but will also be a cherished part of your celebrations for years to come.


